
Stitch
Half-cross tent stitch
See how half-cross differs from continental, then follow a numbered two-row exercise and inspect the short reverse links.

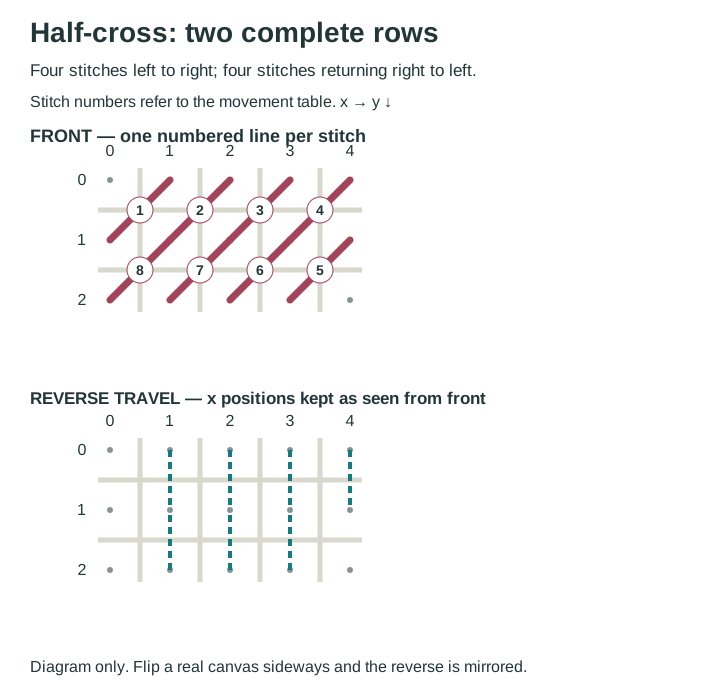
Half-cross tent stitch and continental can look almost identical from the front. In this horizontal-row half-cross exercise, the thread travels a short vertical distance on the back between neighboring stitches. Continental uses a longer diagonal reverse link. Turning the canvas over is the simplest way to tell which route you actually worked.
| Feature | Half-cross in this lesson | Continental |
|---|---|---|
| Front | One diagonal over one intersection | The same visible diagonal |
| Repeated reverse links | Short vertical links | Longer diagonal links |
| First row in these exercises | Left to right | Right to left |
| Best check | Compare the reverse with the diagram | Use the paired continental lesson |
Follow two complete rows
The dots are holes; x increases rightward and y downward. Each numbered stitch has one up hole and one down hole. Keep the canvas facing the same way throughout this exercise. Needlepoint Teacher’s half-cross reference provides another instructional view of the stitch.
| Stitch | Needle up (x,y) | Needle down (x,y) |
|---|---|---|
| 1 | (0, 1) | (1, 0) |
| 2 | (1, 1) | (2, 0) |
| 3 | (2, 1) | (3, 0) |
| 4 | (3, 1) | (4, 0) |
| 5 | (4, 1) | (3, 2) |
| 6 | (3, 1) | (2, 2) |
| 7 | (2, 1) | (1, 2) |
| 8 | (1, 1) | (0, 2) |
- Work stitch 1: up (0,1), down (1,0). Come up at (1,1) directly below the last down hole, then go down at (2,0) for stitch 2.
- Repeat this short vertical move for stitches 3 and 4. The first row now contains four front diagonals.
- For stitch 5, come up at (4,1) and go down at (3,2). This begins the lower row at the right, with the needle moving through the visible diagonal in the opposite direction.
- Return right to left through stitches 6–8. The reverse links between these stitches are again vertical. All front diagonals still have the same slant.
Anchor the tail where it can actually be held
Short vertical reverse links will not necessarily capture a tail placed in the same direction as those links. Do not cut off a waste knot merely because several front stitches have been made. Inspect where the tail lies. On a blank exercise, an away knot can hold the start while you create a patch; leave enough tail to thread afterward, remove the knot, and bury the tail beneath several completed reverse stitches. Starting threads explains the options.
End the working thread beneath existing reverse stitches, checking that it remains secure without pulling the front out of shape. Use the thread-ending guide rather than leaving a permanent knot that can create a raised spot under finishing.
Use the comparison to make a decision
Needlepoint Teacher specifically cautions against half-cross on mono canvas. Use this recognition exercise on a canvas whose maker or project guide supports the method; for a mono-canvas project, prefer its specified continental or basketweave route. If a project specifies continental or basketweave, do not substitute half-cross solely because the front looks the same. The different back structure changes how the work is built. Follow the project’s method and material instructions, especially where coverage or the finished object’s use matters.
To compare methods, make two four-by-two patches on the same scrap, leaving a gap between them. Use the same named thread and strand count for both. Work this table on the left and the continental table on the right. Photograph the fronts, flip the canvas, and identify the short vertical versus long diagonal links. This is a recognition exercise; it does not establish a measured thread-saving percentage.
At the edge
A tent stitch represents one intersection. Stop at the last intersection belonging to the color, then start the next row at its own boundary. Do not stretch a diagonal across two intersections to reach an edge, because that changes the stitch. For an isolated colored point, secure a short separate thread or carry only behind an already covered area of a compatible color.
Keep learning

Stitch
Basketweave tent stitch
Work a numbered basketweave field, understand its alternating reverse structure, and handle row turns and a stepped boundary.
Stitch
Continental tent stitch
Learn continental tent stitch with two numbered rows, exact needle movements, a clean return, and a narrow-band example.
Learning path
Your first needlepoint canvas: a learning path
Follow a linked beginner path from choosing a canvas and planning its finish to starting threads, stitching, and checking your first project.