
Stitch
Continental tent stitch
Learn continental tent stitch with two numbered rows, exact needle movements, a clean return, and a narrow-band example.

Continental tent stitch makes a small diagonal on the front and a longer diagonal between stitches on the back. It is a useful first method for a narrow band or a small color area. The important distinction from half-cross is the thread’s route between stitches, not the front-facing slant.
Read the coordinates once
In the diagram, each dot is a canvas hole. Coordinates are written (x,y): x increases to the right and y increases downward. The canvas threads lie between the dots. “Up” brings the needle to the front; “down” takes it to the back. Stitch numbers identify complete stitches, not individual holes. All eight front stitches lean from lower left to upper right.
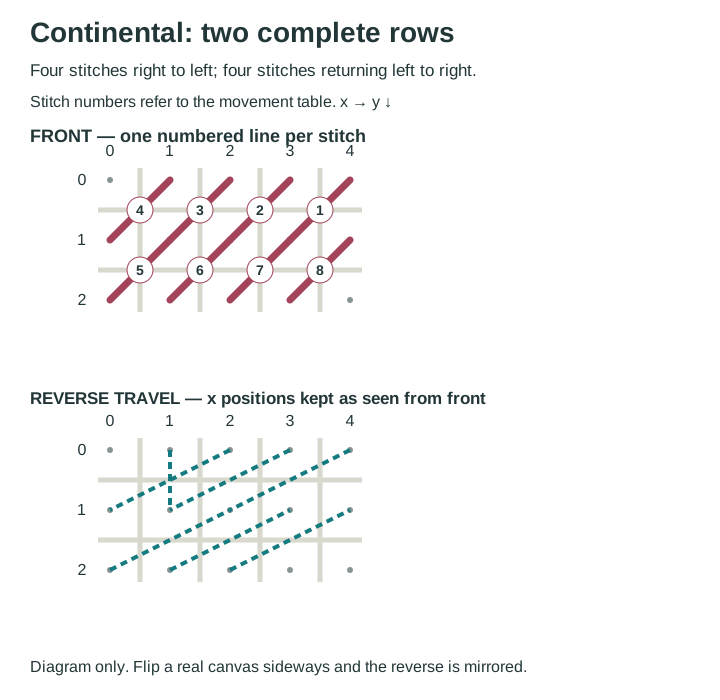
Work the first row and its return
| Stitch | Needle up (x,y) | Needle down (x,y) |
|---|---|---|
| 1 | (3, 1) | (4, 0) |
| 2 | (2, 1) | (3, 0) |
| 3 | (1, 1) | (2, 0) |
| 4 | (0, 1) | (1, 0) |
| 5 | (1, 1) | (0, 2) |
| 6 | (2, 1) | (1, 2) |
| 7 | (3, 1) | (2, 2) |
| 8 | (4, 1) | (3, 2) |
- Secure a starting tail, then come up at (3,1) and go down at (4,0) for stitch 1. Move behind the canvas to (2,1). That move crosses two columns and one row; it is the long continental reverse link.
- Work stitches 2–4 from right to left. After stitch 4 the needle is behind the canvas at (1,0).
- Come up at (1,1) to start stitch 5. Go down at (0,2). This changes the direction of the needle through the diagonal while keeping its visible slant unchanged.
- Continue stitches 6–8 from left to right. Between stitch 5 and stitch 6, the reverse goes from (0,2) to (2,1), another long diagonal.
- For a third row below these, work right to left again: up at (3,3), down at (4,2), then continue left.
The alternating row directions match the Royal School of Needlework’s description of continental tent stitch. A short turn between rows is normal; judge the method by the repeated reverse links within each row.
Start and finish without leaving a knot
On blank practice canvas, use a waste knot on the front in the path of the first stitches. Bring the needle up at the starting point and keep the loose tail on the back where the following reverse stitches can trap it. Inspect the back before cutting away the knot: several stitches must actually cross and hold the tail. If the path misses it, use an away knot with enough tail to thread afterward and bury it under the completed stitches. See starting a thread.
When enough dense stitching exists, slide a new tail under several reverse stitches of the same color before emerging at the next starting hole. To end, take the working thread to the back, pass beneath existing stitches without cutting or piercing canvas threads, check that the end holds, then trim. The ending-thread lesson shows the decision in more detail.
A narrow band and a stepped edge
For a band four intersections wide and six rows high, repeat the two-row exercise three times. Count four front stitches in every row. If the next row of a painted area is only three intersections wide, omit the outside stitch and begin at the first intersection that belongs to that color. A tent stitch occupies one intersection, so there is no need to squeeze a fractional stitch into a painted boundary. Keep the same slant and the long reverse route within each remaining run.
If a color continues in a separate island, end and restart rather than dragging a dark thread behind a pale unstitched area. Check the reverse after the first two rows: mostly short vertical links mean you have drifted into half-cross. If the canvas pulls out of square, inspect tension and support before adding more rows.
Keep learning

Stitch
Basketweave tent stitch
Work a numbered basketweave field, understand its alternating reverse structure, and handle row turns and a stepped boundary.
Stitch
Half-cross tent stitch
See how half-cross differs from continental, then follow a numbered two-row exercise and inspect the short reverse links.
Learning path
Your first needlepoint canvas: a learning path
Follow a linked beginner path from choosing a canvas and planning its finish to starting threads, stitching, and checking your first project.