
Stitch
Mosaic stitch
Build a mosaic field from its 1–2–1 units, follow block and row transitions, and shorten a unit at a missing corner.

Mosaic stitch makes a small square unit from three diagonals: one short, one twice as long, then another short. Four such units form the field below. Learning both the unit and the journey to its neighbors makes it much easier to use mosaic inside a painted shape.
Count threads, not diagram pixels
Each dot in the diagram is a canvas hole. A short diagonal spans one canvas thread horizontally and one vertically. The middle diagonal spans two in each direction. A full unit therefore covers a two-by-two area of intersections. This is the basic structure described by the Royal School of Needlework’s mosaic reference.
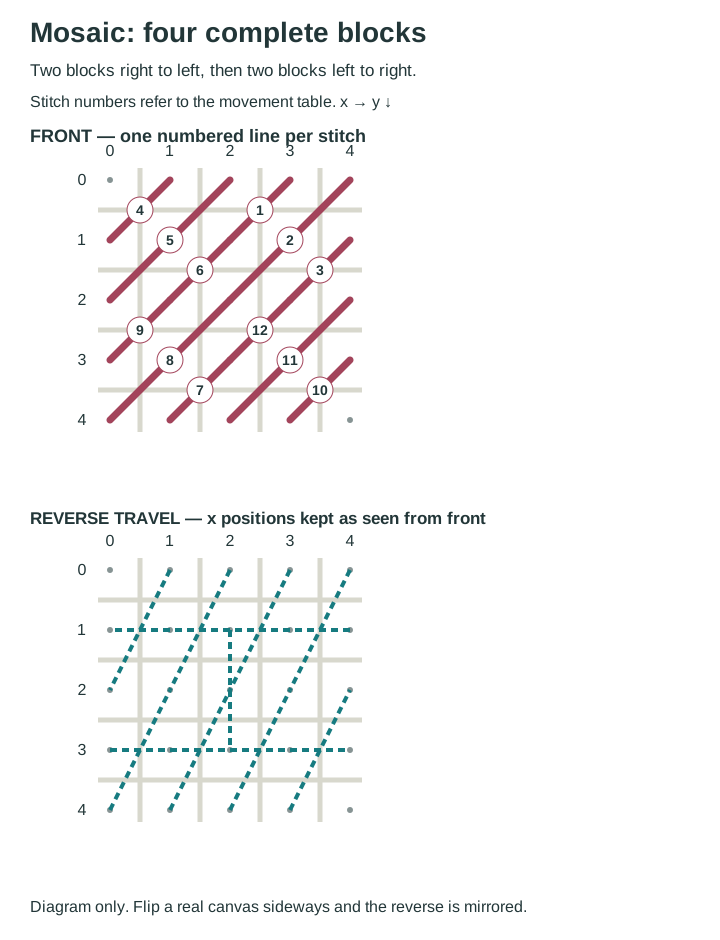
| Stitch | Needle up (x,y) | Needle down (x,y) |
|---|---|---|
| 1 | (2, 1) | (3, 0) |
| 2 | (2, 2) | (4, 0) |
| 3 | (3, 2) | (4, 1) |
| 4 | (0, 1) | (1, 0) |
| 5 | (0, 2) | (2, 0) |
| 6 | (1, 2) | (2, 1) |
| 7 | (2, 3) | (1, 4) |
| 8 | (2, 2) | (0, 4) |
| 9 | (1, 2) | (0, 3) |
| 10 | (4, 3) | (3, 4) |
| 11 | (4, 2) | (2, 4) |
| 12 | (3, 2) | (2, 3) |
Work the block-to-block sequence
- Work stitches 1–3 in the upper-right unit. The long middle stitch is number 2.
- Move behind the canvas to (0,1), the up point for stitch 4. Work stitches 4–6 to complete the upper-left unit. The first row of blocks travels right to left.
- For the lower-left unit, come up at (2,3) for stitch 7. Work 7–9, reversing the entry direction while retaining the same front slant.
- Move to (4,3), then work 10–12 in the lower-right unit. This row of blocks travels left to right.
- Repeat two-thread-high bands below, keeping every block anchored to the same two-by-two grid.
Keep reverse travel relaxed enough that it does not pull neighboring units together. The diagram shows one explicit route so the transitions can be followed; a project guide may use a different working order. Do not change the shape or location of the three front stitches when changing travel.
Compensate a missing corner
Suppose a painted boundary excludes the upper-right intersection of one unit. In local coordinates, the usual long stitch would run from (0,2) to (2,0) and cover that excluded intersection. Shorten it to (0,2) → (1,1). Retain the other two short stitches. The result fills the remaining three intersections without stitching across the boundary.
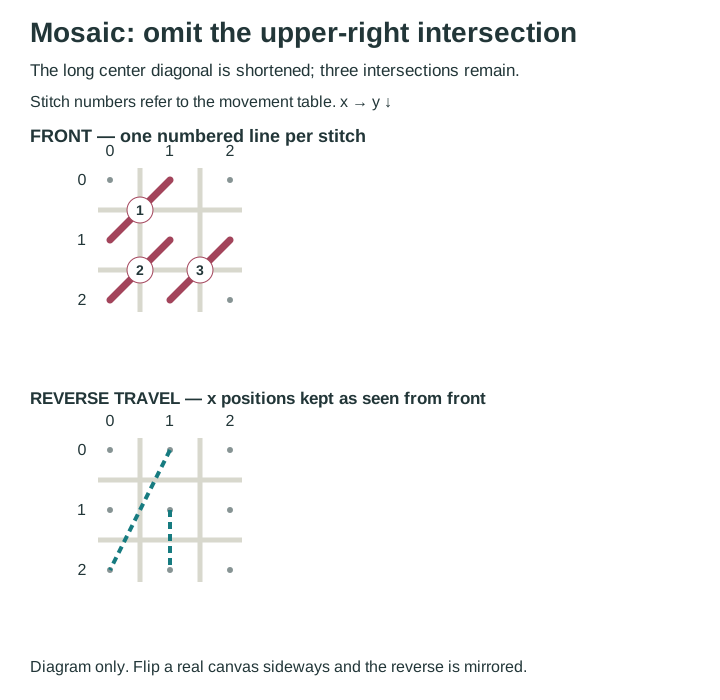
| Stitch | Needle up (x,y) | Needle down (x,y) |
|---|---|---|
| 1 | (0, 1) | (1, 0) |
| 2 | (0, 2) | (1, 1) |
| 3 | (1, 2) | (2, 1) |
Do not slide the whole unit sideways to make it fit; doing so shifts the repeat in the next row. If the shape is so narrow that almost every unit is partial, continental tent stitch may describe the area more clearly. Planning compensation at curved boundaries develops that decision.
Start, end, and choose a scale
An away knot gives you a temporary start without assuming that a particular reverse path will trap the tail. After a dense patch is worked, remove the knot and secure the tail beneath existing reverse stitches. Start later threads beneath an already covered area of the same color; end them the same way. See starting threads for the full method.
A two-thread repeat is nominally 2/13 inch wide on 13 mesh and 2/18 inch on 18 mesh: about 0.154 and 0.111 inch. A narrow strip only three intersections wide contains one complete unit plus compensation, not a row of multiple full squares. Count the available space before choosing mosaic for lettering, a tiny petal, or a roof edge.
The numbered drawings describe stitch geometry. For selecting a material, assess cotton constructions or silk thread preparations on the actual mesh; the drawing does not establish a universal strand count.